
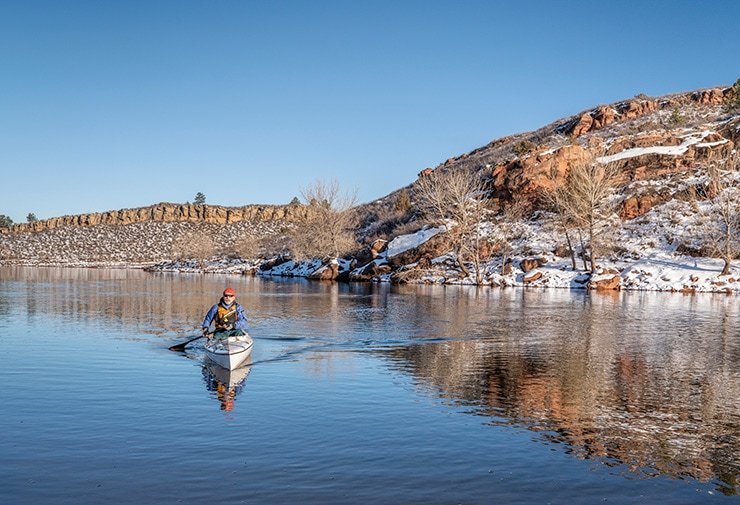
Kayaking can be a great way to get a unique perspective on nature and a truly remarkable way to take some beautiful photographs. If you’re looking for a way to improve your kayak photography, this how-to guide will take you through all the steps you need to know to do it safely and competently.
Key Takeaways
- You can bring your camera with you on your kayaking trips but there are steps you need to take to keep your gear safe and take great photos.
- Use a dry bag and a rain cover to protect your camera gear from water damage, and choose a DSLR camera with a high-zoom lens for wildlife photography.
- Check the weather forecast, the water situation, and the sun position before going kayaking, and wear a life jacket and apply sunscreen for your personal safety.
- You should be quiet and patient when approaching wildlife, and use vibration reduction, image stabilization, and auto-focus modes to reduce camera shake and blur.
- Kayak photography can be challenging and risky, but also rewarding and fun. You can learn and practice it by yourself or with others.
Can You Take a Camera Kayaking?
You absolutely can take your camera kayaking, but there are some caveats to understand first. The conditions on the water can affect how successful your efforts will be and you’ve got to take extra steps to protect your photography equipment.
The reward is well worth it though, some of the best wildlife photography can only be done from the water, and once you learn how to keep your gear safe and choose the right conditions, you’ll be awarded a glimpse into an entirely new world.
Everything You’ll Need to Keep Your Equipment Dry
There are two very important pieces of equipment you’ll need, but you can usually find these at most major sports stores – these items are:
- A Towel
- A dry bag
You’ll want to get a dry bag (waterproof bag) that can fit your camera gear and that you can pack easily while fitting onto your kayak – if you have a sit-on-top kayak you might need to secure it with straps.
Also, you might want to add extra paddings or towels to provide some extra layers of protection for your gear. This is everything you need to keep your camera dry and all your photo gear working for a long time to come.
Making sure that you have adequate storage space in your kayak for all your gear is vital as well.

How to Take Pictures While Kayaking
If you want to take some scenic shots while kayaking, or you just want to know how to better utilise your smartphone while out on your next kayaking adventure, these tips will tell you everything you need to know.
How do I protect my camera (or phone) while kayaking?
The best way to protect your camera while kayaking is to only use your camera when you need to. Avoid fiddling with it or constantly taking it out of your bag to check on it, this is a really good habit to get into and will prevent any unnecessary accidents.
If you find yourself having to use your camera frequently or you’re in environments with lots of saltwater then you can invest in a rain cover.
Step 1: Choose The Right Camera
The right camera depends entirely upon your goals, but there are some fairly stand-out options across the board. For taking a few quick pictures and building up documentation of your kayaking trips a smartphone or any good quality, small, waterproof camera (if you prefer not to risk your smartphone) will do.
However, if you want to take much higher quality pictures, the kind that wildlife photographers go for then you’re going to need a DSLR (Digital Single Lens Reflex camera). These can range anywhere from a few hundred to a few thousand in price.
You want to get a camera that can go to at least 500mm zoom. The higher zoom cameras tend to be bigger and bulkier, and thus become harder to transport.
Your best option is to seek the advice of a specialist camera store, they will often explain all the features of a single DSLR in detail and let you try several out to see which one you feel the best with.
A good store won’t try to just sell you the most expensive camera, they’ll help you figure out what the best equipment is for taking photos on your kayak.
Step 2: Plan Your Trip
There are a whole bunch of factors that determine what the best photograph conditions are for when you go kayaking, understanding these will help you make the most of your trips instead of giving up in frustration.
A lot of these factors aren’t so much different from planning a usual trip but there are some unique things to consider when it comes to picking conditions your camera gear likes best.
Check the Weather
Look at the forecast and check the rain forecast – a little bit of rain is ok but a lot could potentially ruin your chances of a good photograph. You should also check out stuff like the wind and the overall situation on the water. Choppy waters and rough winds can cause problems with stability.
Always Pack Your Safety Gear
Sometimes you can get so caught up in keeping your camera gear safe that you forget that safety should be the number one priority for yourself. Don’t ever forget sunscreen, water – and your number one piece of equipment – a life jacket!
Your personal flotation device (PFD) is a vital piece of equipment that can get you out of a ton of bad situations, not to mention, it’s illegal in most (if not all states) to not have a PFD while out on the water.
Consider the Waters You’ll Be Paddling
Dunking your camera in the water is never a good idea. However, salty seawater can be very bad for your camera and cause it to malfunction. You can use your rain cover for some protection and a UV filter on the end of your lens can be very helpful.
Choose the Best Time of the Day
Some might argue that the best time of day for this type of photography excursion is the early morning. This makes a lot of logical sense, for anyone interested in wildlife photography, the wildlife is often more active in the earlier hours of the morning and it also gives you the most amount of light for the day.
However, if you want to capture some good light effects courtesy of nature, sunset or later on in the afternoon can bring out all the vibrant colors of nature (especially in the autumn)
There’s no single time of the day that’s best for photography – if you prefer shooting later in the day then you can get some truly awe-inspiring pictures of natural vistas.
Step 3: Getting the Best Shot
The first step to getting a good shot is to get off to a good start. You should put your dry bag in the kayak first if you’re setting off from the shore. Double-check that it’s secured properly to the kayak and then launch away steadily.
If setting off from a dock, a lot of people like to get onto the kayak first and then attach their dry bag once they’re in. You might need the help of someone else to pass you your gear depending on how bulky it is.
Approach Cautiously
Kayaks are very quiet and depending on the type you use (fishing kayaks are super stable, for example). If you’re attempting wildlife photography then you’ll need to be quiet and cautious to not scare away any wildlife.
One of the hardest parts of photography is patience, when you first start it’s fun to just test your camera out, but you start to develop an eye for the right scenes. The unique thing about kayak photography is that getting into a proper position is an art in itself.
Finding the perfect photo op means not scaring it away or disrupting it. It’s incredibly difficult to master this at first because animals often don’t oblige us with the time to set up well, but if you rush and scare them off then you’ve wasted even more time.
Taking The Shot
A stable kayak gives you sharp images, but there are often unavoidable motions on even the best kayaks due to the nature of the water they’re floating on, which can lead to camera shake and blurry images. Thankfully, modern technology does have some solutions.
A lot of cameras come with vibration reduction, image stabilization, and a host of other settings that make taking nice photos much easier. You might want to consult your user manual for the camera because not all cameras and DSLRs have the same settings.
Your camera will also have auto-focus modes that can help take great shots even when you hold the shutter down. This helps take good images with cameras that have a higher shutter speed and slower lenses.
Learn About The Area
The more familiar you are with an area and the more experience you have with the waterways, the less mental space you have to devote to worrying about your kayak and all the equipment, and the more you can put to work on finding the best photography spots.
If you’re trying to get specific pictures of certain wildlife, then the more you learn about their habitats and behaviors, the more likely you are to be able to find their favorite spots.
Step 4: Acknowledge the risks (Gear Tipping)
One of the biggest tips that most experienced kayak photographers try and drill into newbies is to always make sure their gear is secure and safe, don’t leave the dry bag open, and try your best not to tip your kayak.
There’s probably nothing worse than potentially destroying thousands of dollars worth of equipment because of careless behavior. This is especially true if you use extra equipment like a tripod setup – they can be very expensive but they also add extra weight and they’re not something that you can quickly set up and take down.
All that said, there’s no way to guarantee risk-free kayak photography, you could suddenly get spooked by a bird and launch yourself into a river (although this is unlikely).
For example, if you’re kayaking out on the ocean then conditions can change very rapidly and unpredictably and the risks of losing or damaging your equipment also increase.

How to Take Pictures While Kayaking Using a Smartphone
The basics of taking a photograph on a kayak are quite simple, simply take out your phone, go to the camera app and press the button that snaps a picture.
However, taking good pictures with a smartphone camera can be trickier, even though technology has advanced rapidly. While there are plenty of people that do take some very nice photos on their smartphones, it’s not as reliable as a dedicated camera.
If you just want to document some of your routes and take pictures of your journey then a smartphone will do the job fine, but you’re unlikely to be taking award-winning photographs anytime soon. However, you’ll still be able to capture some nice shots for your own pleasure (and great to share on social media too).
Many of the things advised for DSLR cameras apply to smartphones as well, choosing the right lighting is important and trying to keep as stable as possible is also important.
However, it’s a good idea not to get too trigger-happy with snapping tons of photos. You can get a waterproof case for most phones.
Smartphones do have settings options like the DSLRs, but they’re probably not going to be nearly as sophisticated or work as well as a camera dedicated to the job.
How Do You Take a Selfie on a Kayak?
Taking a selfie on a kayak is the same as taking one on dry land – simply turn your camera towards yourself and press the button.
As mentioned, it’s important not to get so carried away taking selfies that you don’t pay enough attention to the environment around you, it’s no good taking the perfect selfie and then dropping your phone in deep water.
Conclusion
Anyone can learn kayak photography and take great pictures. However, photography is quite an expensive hobby to get into, so if you want to take photos with your smartphone instead, then this could be a good starting point.
Like any discipline, it takes time to develop your skills with the camera, and you also have to have a ton of patience to wait for the best shots.
We hope you found this how-to guide useful, please share in the comments if you found this useful and have any of your own handy photography tips to share.